Wednesday, 29 January 2020

Feedback From Latest Pitch

In our latest pitch to Luke,  he told us that he thinks it would be a good idea if when we show our sequence, we show two of our clips at the same time in non chronological order.
 This way of showing our clips can make the audience members feel quite disturbed because it isn't done in a general order and may confuse them but this will in-turn create tension for them.


As for our titles, depending on the placement of the videos we will only place them when there is a video showing or as it goes off the screen.

Luke liked our pitch but he wants to see a storyboard and shot list and as we are doing two videos on the screen at the same time we will need to double up on how many shots we take so we will probably be taking between 30-60 shots. This will give us more room to work with and we will be able to tell a better story.

Mood Board

For our mood board we went with a red and orange theme because they are colours coordinated with danger and hazard. The darker colours represent the mystery of the film. With the colour of the yellow, this can stand out from the background of the dark woods.

Wednesday, 22 January 2020

Learning to Edit with Matt

Matt started off by telling us some facts about editing:

Folders are called bins.
Rushes are names given to completely unedited version of the clips you filmed but have selected to use in your video.

He then showed us the first step to do when editing:
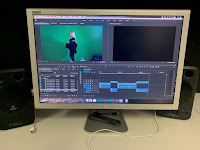
On the box in the bottom left hand corner we had to right click and select new bin : name it 'log bin'.
Click the video's logo you want and right click to copy, then click your new bin and paste it in there.
Only rename the clips once they are in the new bin to things that are about the clip, e.g 'wide shot'.
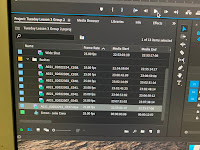

He also mentioned when it is in the main 'bin' we shouldn't rename the file because if the system crashes it is easier to find instead of going through all the footage.

When editing the footage, Matt said we should cut any extra footage from the clip so it gets moving and doesn't waste the audiences time.
When choosing where to start your clip from, Matt gave us a tip that if you press the 'I' key on the keyboard that will cut it and if you want to selected where the clip should end you press the 'O' key.
Once you have your preferred clip then you can drag the clip on to the timeline.

When editing clips together, to make it run and look smoother, you should cut when the object in footage is moving to make it flow better.

After you have put a sequence of clips together and you want to save it, you just press 'command c'.

If you need to cut parts of clips out after you've dragged them onto the timeline, you can press 'c' and this will turn your cursor into a razor and you just select the point of the clip you want to get rid off.
To make the cursor return back to an arrow, you just press 'v'.
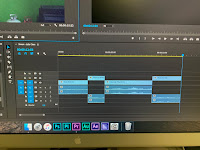
When the clips are in the timeline, you should alternate the level they are on to make it easier for you to drag a clip if you want to change the length of one of them and then you don't need to move all the clips along. The program will play which ever clip is on top.
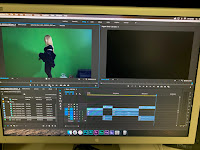

 The final step we learnt in todays lesson is that when making the video play on full screen, you just press the button that is under the escape button.


Casting Choices

Casting:

Actress: Tally Goss
Age: 17
Height: 5'4
Skills: Singing, Acting, Dancing, Hockey, Netball, Accents: Cockney, American and Australian.
The reason why we have Talia Goss in mind is that she fits the stereotypical dumb blonde aesthetic and that her acting abilities would suit this role.


Actor: Simon Wood
Age: 48
Height: 5'10
Skills: Acting, Singing, Bass, Guitar, Accents: Russian, Cockney, Australian, Italian and German.
The reason we have Simon Wood in mind for our video is because of his past experience in other short films. He has already played a creepy taxi driver before and because of this we know he would
fit the role well.
Past Film Experience:
 https://www.youtube.com/watch?v=AUW_2kaahZg
 https://www.youtube.com/watch?v=SnyL-IB_Rg0


Actress: Annabelle Youngman
Age: 17
Height: 5'7
Skills: Dancing, Acting, Singing, Netball, Skiing, Hockey and Photography.
We decided to cast someone like Annie because she contrast the protagonist (played by Tally Goss) due to the fact that they have two different looks.


Extras:

Zara Harris
Linda Lindfors
Allo Strömberg
Lisa
Dasha

Scriptwriting

When scriptwriting, there are some simple rules to follow before you begin. Actual scriptwriters will abide by these rules so it is easy for them and the actors to follow what's going on.

- Screenplays are traditionally written on 8 1/2" x 11" 3-hole punched paper.
- A page number appears in the upper right hand corner of the page.
- No page number is printed on the first page.
- The font style used is Courier 12.
- The top and bottom margins are between 1.25cm/0.5" and 2.5cm/1".
- The left margin is between 3cm/1.2" and 4cm/1.6".
- The right margin is between 1.25cm/0.5" and 2.5cm/1".
- The extra white space on the left of a script page is left there so it can be easily binded and none of the words will get punched through.
- The Courier 12 font is used for timing purposes. One script page in Courier 12 roughly averages 1 minute of onscreen film time.


For our opening sequence, we are going to keep the dialogue to a minimum and only have a few lines so we can focus mainly of the foley sounds we can produce to create more tension.

Foley Sounds

Foley sounds are the reproduction of everyday sound effects that are added to films, videos to enhance the audios quality. The sounds can be anything from footsteps on squeaky floorboards to breaking glass and as simple as the swishing of clothing.

Here is a video about Foley Sounds:

Lesson 4 with Matt - Editing a sequence

After we filmed a short little sequence, we then went back into the editing suite and Matt gave us a lesson on how we can edit these.

We made sure to look at the rules that we had learnt in the camera lesson when editing such as the 180 degree rule and the rule of thirds.

As we went through, we took our footage from the rushes and put them in log bins, this made it easier for us to keep track of what clips we were using.

We had to look carefully at the way the actors moved in the clips and make sure that the clip before and the clip after matched their movements.

Lesson 3 with Matt - Filming a sequence

In this lesson, we filmed a short sequence in the editing suit. This consisted of Elliot and Poppy walking to meet each other in the room and Elliot told her that he doesn't love her anymore and she pushed him away.

We got lots of shots of them:
- Elliot talking through the door
- Their feet walking towards each other
- An upwards panning shot of them together


Camera Lesson 2 - 180 degree rule / rule of third

During this lesson, we began by learning the 180 degree rule. This means all the action must take place on a 180 degree axis. If this is crossed the camera can not reflect our own eyes and therefore the scene looks wrong. This is often demonstrated in films such as the hero will be walking in from the left and the villain from the right, because our eyes naturally gravitate from left to right, just like how we read.
After learning about this we then looked at the rule of thirds. The rule of thirds naturally, when we are looking at an image we tend to place our person in the middle of the frame, however if we think about it we are drawn to points of interest and as we read left to right we should stick it on a certain axis. We have have someone of the left hand corner with their head on one part of the third and they may be point a gun at another part of the third. an example of this is that in our classroom we have a poster of the movie 'Drive', in this poster the actor is entirely on the left hand side of the poster bt if you look at the bottom of the image you can see he is carrying a hammer, this is in the bottom third. As you focus from left to right you would notice that the hammer is the first thing we see as an audience, and then we focus in on his eyes. This is something I will be looking at and addressing in my own opening sequence, and I will be thinking of the framing and composition of the shots.
After learning about the rule of thirds we then applied this, we went back to bubbling the camera and the tripod, assembling the tripod and the camera on top, the black magic mini Ursa and then we filmed a sequence ourselves. In my sequence we had a girl walk into frame and take out her phone, look at it and put it back in her pocket and then walk off of the cameras view. We made sure she was on the 180 degree rule, we made sure she stood on one side of the 180 degree rule axis so when we focused in on her putting the phone back in her pocket we could then cut to a close up angle of her hands doing this action.
This was a basic sequence of events but it was something we needed to know in order to film because we don't want to make the mistake of not sticking to the rule when we actually film our own sequence.
In the next lesson we will be editing this together before we start to film more sequences.

Camera Lesson 1 - How to use a camera

On the 17th of January, our class went into the schools studio to listen to Matt talk us through how to set up a camera and tripod. We started off by pulling out the tripod and setting it up.
With the tripod, we took it out of the bag and pulled out the legs to make it stand up straight and tall and then we had to bubble it to make sure all the legs were even so the camera will be level and not unbalanced.


Then we attached the camera, which was a 'Black Magic Mini Ursa', by using the button on the side to slide the camera into the centre and then using a fastener screw to keep it in place. We then added
    the battery pack to the camera by sliding the 'V formation' into  
    the corresponding slot.
Once we had the camera assembled, we then had a go at focusing the camera in a setting. So we had to zoom in on a background object or someones eye if we were shooting a person, make the camera go into focus and then zoom back out so the image was clearer. We then followed this by learning how to white balance. As black magic cameras are touch screen this was quite easy to do. We would touch the screen and then press the logo for it and select the corresponding surrounding setting to make sure the lighting was right on the camera, so we had to choose wether we had studio lights or natural lighting.

Our Pitch To Luke

On Monday 20th January 2020, Luke, one of the teachers in school came into our class to listen to each groups pitch for their ideas on the opening sequence they want to create. We made a presentation and presented it to him with our group. Luke said that he liked our overall idea but he wants us to make it less narrative so we don't give away the whole film in our 2 minute video. He wants us to film it in a way which one, doesn't take up as much time and also in a way that it flows less but intrigues the audience by showing different things on the screen at the same time. Instead of having only one clip on the screen at a time we can split the screen and show multiple so the audience can follow the story that is going.

Our media teacher Simon then recommended to have a look at 'True Detective' and see how they edit their episodes to give us an idea of what kind of things we should be looking out for and including.

Passenger Seat: Planning First Draft

This is the powerpoint my group came up with to explain our idea and help us put all our ideas down so we could present it to our teacher Luke to get his opinion on our sequence.


Powerpoint for My Opening Sequence


Tuesday, 14 January 2020

Our Groups Opening Sequence

For our group we decided on an opening sequence about a drunk girl who was at a party and decided to get an Uber-share home. There are already 2 girls in the car. There is a girl in the front who doesn't talk and has sunglasses on and the girl in the back seem very upset and anxious. The new girl who just got into the car realises that something isn't right and the girl to her side writes 'HELP!' on her hand in red lipstick. They realise the girl in the front is dead and that this Uber driving is a kidnapper. Then it cuts to a news video about 3 girls who were kidnapped.

The reason this was chosen over the other ideas that were presented is because the other ideas were very complex and would've taken a lot of extras to make which wouldn't be possible. It is also a better idea to do this one as we can get creative with close up shots of the driver and really be able to show the girls reactions to the situation. It is also   quite a unique idea and doesn't happen or isn't televised that often.

Monday, 13 January 2020

Kingsman Scene Analysis

Kingsman:

1. Element of reality; believability in the diegetic world of the characters as the opening scene starts in war in the Middle East in 1997.

2. The scene introduces characters and sets up the background to the story of the 2 main characters which demonstrates how they first met.

3. We are introduced to the world of the character of Eggsy as a child which enables us to understand the context of the characters motivations for later actions.

4. The sequence gives some insight into the narrative of the film as it introduces props that. are vital to the plot later in the film.

5. Aspects of the genre are also revealed as we witness spies interrogating a potential terrorist who blows himself up, soldiers blowing up buildings on aircrafts as well ass the diegetic dialogue. as the spy Harry informs his dead colleagues wife that she is unable to discuss how her husband died.

Overall the opening sequence gives us background of the characters, elements of the genre and the opening of the storyline to hook the audience into watching the rest of the film.


The Final Product - Passenger Seat